Spring 控制反转(IOC)
在 Spring 中,程序员需要描述依赖关系,从而指导 Spring 进行依赖注入工作。
一、控制反转(IOC)
二、Spring 的 IOC 实现
Spring 通过依赖注入(DI)的方式实现 IOC
依赖:所谓依赖,就是一个对象所需的东西
1
2
3
4
5
6
7
8
9
10
11
12
public class Student {
private int ID;
private Teacher teacher;
public Student(int ID) {
this.ID = ID;
}
public void setTeacher(Teacher teacher) {
this.teacher = teacher;
}
}Student 对象依赖于 ID 和 teacher
依赖注入:所谓依赖注入,就是由容器将依赖装配进对象之中
1
2
3
4
5
// 通过构造方法注入ID
Student student = new Student(0001);
// 通过setter方法注入teacher
student.setTeacher(new Teacher);
三、需要做什么?
需要描述 Bean 的依赖关系,指导 Spring 进行依赖注入。
一共有三种方式:
- 在 XML 文件中显式配置
- 基于构造函数的依赖注入
- 基于 Setter 的依赖注入
- 自动依赖注入
- 在 Java 中显式配置
四、基于构造函数的依赖注入
1. 说明
Spring 将会调用构造方法,并在构造方法中放入参数,从而实现依赖注入。
2. 注入值
(1) 依赖为基本类型
用 value 属性传递依赖值
1 | |
(2) 依赖为对象
首先配置依赖对象,然后用 ref 引用
1 | |
3. 参数匹配
为了使 constructor-arg 标签与构造函数中的参数相匹配,往往需要显式指定匹配关系
(1) 不显式指定
如果依赖的类之间没有继承关联,则可以无需匹配,直接按顺序描述依赖即可。
1 | |
实体类:
2
3
4
5
6
7public class Student {
private String name;
private int ID;
// 构造器
}配置文件:
2
3
4<bean id="student" class="pojo.Student">
<constructor-arg value="小李"/>
<constructor-arg value="1001"/>
</bean>测试结果:

(2) 指定下标
1 | |
(3) 指定类型
1 | |
(4) 指定参数名
1 | |
4. c 命名空间
(1) 什么是 c 命名空间?
c 命名空间允许使用 bean 标签的属性(而不是子标签)来描述依赖
(2) 使用方式
在 beans 标签中增加属性
xmlns:c="http://www.springframework.org/schema/c"1
2
3
4
5
6
7
8
9<beans xmlns="http://www.springframework.org/schema/beans"
xmlns:xsi="http://www.w3.org/2001/XMLSchema-instance"
xmlns:c="http://www.springframework.org/schema/c"
xsi:schemaLocation="http://www.springframework.org/schema/beans
http://www.springframework.org/schema/beans/spring-beans.xsd">
···
</beans>在 bean 标签中,用属性描述依赖,如下:
1
<bean id="Bean名" class="全限定类名" c:依赖名="依赖值" p:依赖名-ref="Bean名"/>
(3) 示例
普通方式:
1 | |
p 命名空间:
1 | |
五、基于 Setter 的依赖注入
1. 说明
Spring 会首先实例化对象,然后通过对象的 setter 方法注入依赖。
2. 注入值
(1) 依赖为基本类型
用 value 属性传递依赖值
1 | |
(2) 依赖为对象
首先配置依赖对象,然后用 ref 引用
1 | |
(3) 依赖为数组
1 | |
(4) 依赖为 List
1 | |
(5) 依赖为 Map
1 | |
(6) 依赖为 Set
1 | |
(7) 依赖为 Properties
1 | |
3. 空值和 null
(1) 依赖为空值
将 value 属性值设为空字符串即可。
1 | |
(2) 依赖为 null
使用 null 标签。
1 | |
4. p 命名空间
(1) 什么是 p 命名空间?
p 命名空间允许使用 bean 标签的属性(而不是子标签)来描述依赖
(2) 使用方式
在 beans 标签中增加属性
xmlns:p="http://www.springframework.org/schema/p"1
2
3
4
5
6
7
8
9<beans xmlns="http://www.springframework.org/schema/beans"
xmlns:xsi="http://www.w3.org/2001/XMLSchema-instance"
xmlns:p="http://www.springframework.org/schema/p"
xsi:schemaLocation="http://www.springframework.org/schema/beans
http://www.springframework.org/schema/beans/spring-beans.xsd">
···
</beans>在 bean 标签中,用属性描述依赖,如下:
1
<bean id="Bean名" class="全限定类名" p:依赖名="依赖值" p:依赖名-ref="Bean名"/>
(3) 示例
普通方式:
1 | |
p 命名空间:
1 | |
六、自动依赖注入 - XML
1. 匹配方式
byName:根据 Bean 名 匹配依赖,自动依赖注入
Bean名、对象参数名需要保持一致且唯一
byType:根据 Bean 的类型 匹配依赖,自动依赖注入
Bean 类性、对象参数类型需要保持一致且唯一
constructor:类似于 byType,但依赖注入基于构造函数
2. 配置
1 | |
七、自动依赖注入 - 注解
1. 使用方式
(1) 前置工作
增加 context 命名空间:
1
2
3
4
5
6
7
8
9
10
11
12<?xml version="1.0" encoding="UTF-8"?>
<beans xmlns="http://www.springframework.org/schema/beans"
xmlns:xsi="http://www.w3.org/2001/XMLSchema-instance"
xmlns:context="http://www.springframework.org/schema/context"
xsi:schemaLocation="http://www.springframework.org/schema/beans
http://www.springframework.org/schema/beans/spring-beans.xsd
http://www.springframework.org/schema/context
http://www.springframework.org/schema/context/spring-context.xsd">
···
</beans>开启注解功能:
可以使用
<context:annotation-config>或<context:component-scan>,其中:<context:component-scan>用于为 Spring 中的 Bean 对应的类开启注解如果类使用注解,但 Spring 中并没有对应的 Bean,则注解不会生效
<context:component-scan>除了<context:component-scan>的功能外,还会扫描指定包下的类,并根据注解注册对应的 Bean
1
2
3
4
5
6
7
8
9
10
11
12
13
14
15<?xml version="1.0" encoding="UTF-8"?>
<beans xmlns="http://www.springframework.org/schema/beans"
xmlns:xsi="http://www.w3.org/2001/XMLSchema-instance"
xmlns:context="http://www.springframework.org/schema/context"
xsi:schemaLocation="http://www.springframework.org/schema/beans
http://www.springframework.org/schema/beans/spring-beans.xsd
http://www.springframework.org/schema/context
http://www.springframework.org/schema/context/spring-context.xsd">
<!--开启注解功能-->
<context:annotation-config/>
<!--开启注解功能,扫描包中的类,根据注解注册对应的Bean-->
<context:component-scan base-package="全限定包名"/>
</beans>
(2) 配置
使用注解配置自动依赖注入:
在类的属性或 setter 方法上,添加 @Autowired 注解
1 | |
2. @Autowired
(1) 匹配方式
首先使用 byType 方式进行匹配,
当存在一个以上相同类型的 Bean 时,使用 byName 方式进行匹配
实体类:
2
3
4
5
6public class Human {
@Autowired
private Cat cat;
···
}xml:
2
3
4
5<bean id="human" class="pojo.Human"/>
<bean id="cat1" class="pojo.Cat"/>
<bean id="dog" class="pojo.Dog"/>测试结果:
说明:
首先使用 byType 方式进行匹配,有 Bean 类型为 pojo.Cat,直接匹配成功(虽然名称不匹配)
实体类:
2
3
4
5
6public class Human {
@Autowired
private Cat cat;
···
}xml:
2
3
4
5
6
7<bean id="human" class="pojo.Human"/>
<bean id="cat1" class="pojo.Cat"/>
<bean id="cat2" class="pojo.Cat"/>
<bean id="dog" class="pojo.Dog"/>测试结果:
说明:
当存在一个以上相同类型的 Bean 时,使用 byName 方式进行匹配,由于没有 Bean 名与属性名相符,匹配失败
实体类:
2
3
4
5
6public class Human {
@Autowired
private Cat cat;
···
}xml:
2
3
4
5
6
7<bean id="human" class="pojo.Human"/>
<bean id="cat" class="pojo.Cat"/>
<bean id="cat2" class="pojo.Cat"/>
<bean id="dog" class="pojo.Dog"/>测试结果:
说明:
当存在一个以上相同类型的 Bean 时,使用 byName 方式进行匹配,有 Bean 名与属性名相符,匹配成功


(2) required
@Autowired 有一个名为 required 的属性
当 required 为 true 时,该依赖必须被找到,否则报异常
当 required 为 false 时,该依赖允许为 null,可以找不到
1
@Autowired(required = false)
(3) @Nullable
可以通过 @Nullable 来允许依赖为 null
(4) @Qualifier
可以通过 @Qualifier 指定希望匹配的 Bean 名
1 | |
(5) 注入集合
@Autowired 不仅支持注入单个 Bean,也支持注入集合。
如果在类型为集合的成员变量或其 Setter 上加 @Autowired 注解,则 Spring 会将所有 “与集合成员类型匹配”(包括实现类、子类) 的 Bean 注入到集合中。
Animal 接口:
2
3
4
5public interface Animal {
void eat();
}接口实现类 Cat:
2
3
4
5
6
7
8
9
10
11
12
13@Component
public class Cat implements Animal {
@Override
public void eat() {
System.out.println("cat eat");
}
@Override
public String toString() {
return "Cat{}";
}
}接口实现类 Dog:
2
3
4
5
6
7
8
9
10
11
12
13@Component
public class Dog implements Animal {
@Override
public void eat() {
System.out.println("dog eat");
}
@Override
public String toString() {
return "Dog{}";
}
}ZooService 类:
2
3
4
5
6
7
8
9
10@Service
public class ZooService {
@Autowired
List<Animal> animals;
public List<Animal> getAnimals() {
return animals;
}
}ZooService 类中有成员变量为 Animals 的集合,并在成员变量之上使用 @Autowired 注解。
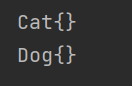
测试代码:
2
3
4
5
6
7
8
9
10@Autowired
ZooService zooService;
@Test
void test() {
List<Animal> animals = zooService.getAnimals();
for (Animal animal : animals) {
System.out.println(animal);
}
}运行结果:
3. @Resource
(1) 匹配方式
首先使用 byName 方式进行匹配,
当没有同名 Bean 时,再使用 byType 方式进行匹配
实体类:
2
3
4
5
6public class Human {
@Resource
private Cat cat;
···
}xml:
2
3
4
5<bean id="human" class="pojo.Human"/>
<bean id="cat1" class="pojo.Cat"/>
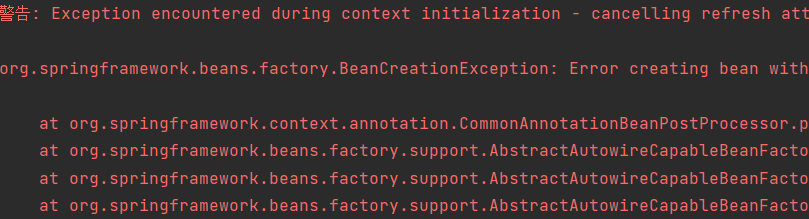
<bean id="cat" class="pojo.Dog"/>测试结果:
说明:
首先使用 byName 方式进行匹配,选择同名 Bean,又因类型不符而报错
实体类:
2
3
4
5
6public class Human {
@Resource
private Cat cat;
···
}xml:
2
3
4
5<bean id="human" class="pojo.Human"/>
<bean id="cat1" class="pojo.Cat"/>
<bean id="dog" class="pojo.Dog"/>测试结果:
说明:
首先使用 byName 方式进行匹配,当没有同名 Bean 时,再使用 byType 方式进行匹配

(2) name
@Resource有一个名为 name 的属性,可以通过它来指定希望匹配的 Bean 名