Spring 配置文件
Spring 配置文件用于指导 Spring 进行 Bean 的创建、管理和装配。
一、简单示例
1 | |
二、bean
1. 说明
用于配置 Bean。
相当于配置 Java 对象
2. 属性
(1) id
Bean 的唯一标识,相当于对象名。
(2) class
Bean 对应的类,填入全限定类名。
(3) name
用于为 Bean 指定别名,并且可以同时指定多个,用空格、,、 ; 划分。
配置文件:
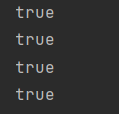
<bean id="hello" class="pojo.Hello" name="aaa bbb, ccc; ddd"/>测试代码:
2
3
4
5
6
7
8
9
10
11
12
13
14@Test
public void test2() {
// 获取Spring的上下文对象
ApplicationContext context = new ClassPathXmlApplicationContext("beans.xml");
Hello hello = (Hello) context.getBean("hello");
Hello aaa = (Hello) context.getBean("aaa");
Hello bbb = (Hello) context.getBean("bbb");
Hello ccc = (Hello) context.getBean("ccc");
Hello ddd = (Hello) context.getBean("ddd");
System.out.println(hello == aaa);
System.out.println(hello == bbb);
System.out.println(hello == ccc);
System.out.println(hello == ddd);
}运行结果:
(4) lazy-init
默认情况下,Spring 会在其初始化时就创建和配置所有的 Bean。
- 好处:可以尽早发现错误,Spring 初始化完成就代表 Bean 配置正确,而不会在运行到中途获取某个 Bean 时发生错误
- 坏处:启动时的内存消耗较大
可以通过设置 lazy-init 的值为 true,使该 Bean 懒加载,则该 Bean 会在需要时才被加载。
1 | |
需要注意的是:
如果懒加载的 Bean 被非懒加载的单例 Bean 依赖,则它仍然会在 Spring 初始化时就被加载。
还设置 beans 的 default-lazy-init 属性,使得配置文件下全部的 bean 都懒加载。
(5) scope
singleton:默认,单例模式
1
<bean scope="singleton" ··· />配置文件:
1
<bean id="hello" class="pojo.Hello"/>测试代码:
1
2
3
4
5
@Test
public void test() {
ApplicationContext context = new ClassPathXmlApplicationContext("applicationContext.xml");
System.out.println(context.getBean("hello") == context.getBean("hello"));
}运行结果:

prototype:原型模式,每次获取都会产生一个新的对象
1
<bean scope="prototype" ··· />配置文件:
1
<bean id="hello" class="pojo.Hello" scope="prototype"/>测试代码:
1
2
3
4
5
@Test
public void test() {
ApplicationContext context = new ClassPathXmlApplicationContext("applicationContext.xml");
System.out.println(context.getBean("hello") == context.getBean("hello"));
}运行结果:

request:作用域为单个 HTTP 请求(用于 Web 开发)
session:作用域为 HTTP Session(用于 Web 开发)
application:作用域为 ServletContext(用于 Web 开发)
websocket:作用域为 WebSocket(用于 Web 开发)
(6) autowire
Spring 可以通过 autowire 实现自动依赖注入。
autowire 共有以下值可选:
byName:根据 Bean 名自动依赖注入,Bean名、对象参数名需要保持一致且唯一
1
<bean autowire="byName" ··· />byType:根据 Bean 的类型自动依赖注入,Bean 类性、对象参数类型需要保持一致且唯一
1
<bean autowire="byType" ··· />constructor:类似于 byType,但依赖注入基于构造函数
3. 依赖注入
三、alias
1. 说明
用于为 Bean 指定别名。
2. 语法
1 | |
3. 示例
配置文件:
1 | |
测试代码:
1 | |
运行结果:

通过 context.getBean("别名") 可以获取到相同的对象。
四、import
1. 说明
用于将其它配置文件合并到当前配置文件中。
2. 使用
1 | |
3. 示例
applicationContext.xml
1 | |
beans.xml
1 | |
beans.xml 文件中的内容将会被合并至 applicationContext.xml 文件中。在使用 Spring 时,只需要传入 applicationContext.xml 文件即可。
4. 使用场景
常应用于团队开发,不同的人开发不同的类并编写各自的配置文件,通过 import 将所有人的配置文件合并使用。
