MyBatis Plus 简单示例

本文将介绍如何使用 MyBatis-Plus 进行简单的增删改查。

一、前置工作

1. SQL

执行下列 SQL 代码,创建一个简单的 user 表,并向其中存入数据。

1
2
3
4
5
6
7
8
9
10
11
12
13
14
15
16
17
DROP TABLE IF EXISTS user;

CREATE TABLE user
(
id BIGINT(20) NOT NULL COMMENT '主键ID',
name VARCHAR(30) NULL DEFAULT NULL COMMENT '姓名',
age INT(11) NULL DEFAULT NULL COMMENT '年龄',
email VARCHAR(50) NULL DEFAULT NULL COMMENT '邮箱',
PRIMARY KEY (id)
);

INSERT INTO user (id, name, age, email)
VALUES (1, 'neo', 18, 'smile1@ityouknow.com'),
(2, 'keep', 36, 'smile2@ityouknow.com'),
(3, 'pure', 28, 'smile3@ityouknow.com'),
(4, 'smile', 21, 'smile4@ityouknow.com'),
(5, 'it', 24, 'smile5@ityouknow.com');

2. 引入依赖

在 pom.xml 中添加:

1
2
3
4
5
6
7
8
9
10
11
12
13
<!--mybatis-plus-->
<dependency>
<groupId>com.baomidou</groupId>
<artifactId>mybatis-plus-boot-starter</artifactId>
<version>3.4.3.4</version>
</dependency>

<!--mysql-->
<dependency>
<groupId>mysql</groupId>
<artifactId>mysql-connector-java</artifactId>
<scope>runtime</scope>
</dependency>

为了减少代码的书写,还额外引入了 lombok 。

1
2
3
4
5
6
7
<!--lombok-->
<dependency>
<groupId>org.projectlombok</groupId>
<artifactId>lombok</artifactId>
<version>1.18.22</version>
<scope>provided</scope>
</dependency>

3. 配置 dataSource

在配置文件中配置如下:

1
2
3
4
5
6
spring:
datasource:
driverClassName: com.mysql.cj.jdbc.Driver
url: jdbc:mysql://localhost:3306/idb
username: root
password: root

4. 配置 MyBatis-Plus

在 config 包下新建 MybatisPlusConfig,配置分页插件。

1
2
3
4
5
6
7
8
9
10
11
12
13
@Configuration
public class MybatisPlusConfig {

/**
* 分页插件
*/
@Bean
public MybatisPlusInterceptor mybatisPlusInterceptor() {
MybatisPlusInterceptor interceptor = new MybatisPlusInterceptor();
interceptor.addInnerInterceptor(new PaginationInnerInterceptor(DbType.H2));
return interceptor;
}
}

二、Java 代码

新建实体类:

1
2
3
4
5
6
7
8
9
@Data
@NoArgsConstructor
@AllArgsConstructor
public class User {
private Long id;
private String name;
private Integer age;
private String email;
}

新建 Mapper 类:

1
2
3
4
@Mapper
public interface UserMapper extends BaseMapper<User> {

}

三、测试

1. 添加

1
2
3
4
5
6
7
8
9
10
@Test
public void testInsert() {
User user = new User();
user.setName("微笑");
user.setAge(3);
user.setEmail("neo@tooool.org");
int res = userMapper.insert(user);
System.out.println(res);
System.out.println(user);
}

插入成功后会将自动生成的组件 ID 返回 user 对象之中

2. 删除

1
2
3
4
5
@Test
public void testDelete() {
int res = userMapper.deleteById(3L);
System.out.println(res);
}

控制台打印结果:

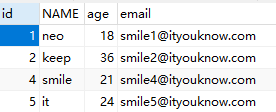
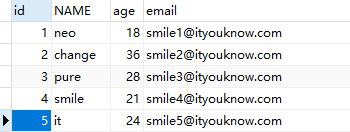
数据库更新结果:

3. 更新

1
2
3
4
5
6
7
@Test
public void testUpdate() {
User user = userMapper.selectById(2);
user.setName("change");
int res = userMapper.updateById(user);
System.out.println(res);
}

4. 查询 - 单条

1
2
3
4
5
@Test
public void testSelectOne() {
User user = userMapper.selectById(1L);
System.out.println(user);
}

5. 查询 - 所有

1
2
3
4
5
6
7
@Test
public void testSelect() {
List<User> userList = userMapper.selectList(null);
for (User user : userList) {
System.out.println(user);
}
}

6. 查询 - 分页

1
2
3
4
5
6
7
8
@Test
public void testPage() {
Page<User> page = new Page<>(1, 2);
IPage<User> iPage = userMapper.selectPage(page, null);
for (User user : iPage.getRecords()) {
System.out.println(user);
}
}

参考