Vue3 改动
具体请看:
一、全局 API
1. 行为 API
(1) Vue2 - 全局行为 API
Vue2 中有很多全局 API,其中部分 API 会全局改变 Vue 的行为,例如 Vue.config、Vue.use、Vue.component、Vue.directive、Vue.mixin、Vue.filter 等,这里把它们称为 “全局行为 API”。
在 Vue2 中全局注册组件:
2
3
4
5
6
7import Vue from 'vue'
// 注册组件
Vue.component(组件名, 组件)
// 创建实例并挂载
new Vue(···).$mount('#app')
(2) Vue3 - 实例行为 API
在 Vue2 中,全局行为 API 是针对整个 Vue,调用以后,通过 new Vue() 创建的所有实例都将会共享相同的结果。
Vue3 中,删除了全局行为 API,并新增了一个全局 API creatApp,它的作用是创建应用实例。与 Vue2 中的 new Vue() 不同,creatApp() 可以看作是创建了更 “独立” 的应用实例,此前的行为 API 都被迁移到了应用实例之下。Vue3 中的实例行为 API 将只会在实例本身生效,而不会影响到全局。
调用方式为:
- 通过
creatApp()方法创建应用实例 - 通过应用实例调用实例行为 API
在 Vue3 中全局注册组件:
2
3
4
5
6
7
8
9
10import { createApp } from 'vue'
// 创建实例
const app = createApp(···)
// 在实例中注册组件
app.component(组件名, 组件)
// 挂载实例
app.$mount('#app')
2. 其它全局 API
在 Vue 中,除了行为 API 之外,还有许多全局 API,例如 Vue.nextTick、Vue.compile 等。
在 Vue2 中,这些 API 暴露在 Vue 之上,通过 Vue.API名 调用。
Vue2 中:
2
3Vue.nextTick(() => {
···
})也可以使用
this.$nextTick(),它是Vue.nextTick()的包裹器。
2
3this.$nextTick(() => {
···
})
而在 Vue3 中,为了更好地减轻打包体积,避免将未使用的 API 一并打包,API 应该从 Vue 中显性导出以后才可以使用。
Vue3 中:
2
3
4
5import { nextTick } from 'vue'
nextTick(() => {
···
})
二、模板指令
1. 双向绑定
v-model 是 v-bind 和 v-on 的语法糖,它能够方便地创建双向绑定,实现根据页面变动更新数据、根据数据变动更新页面。
(1) Vue2 中的双向绑定
在 Vue2 旧版本中,v-model 如果应用在自定义组件上,则会默认利用名为 value 的 prop 和名为 input 的事件进行双向绑定。
Vue2 旧版本中,v-model 应用于组件:
2
3
4
5
6
7
8
9
10
11
12<ChildComponent v-model="childValue"/>
export default {
props: {
value:String
},
methods: {
changeValue(value) {
this.$emit('input', value)
}
}
}
在 Vue2.2 版本中,增加了 model 这个选项,它能够自定义双向绑定的属性名及事件名,但仍然只允许在一个组件上使用一个 v-model。
Vue2.2 中,v-model 自定义属性名和事件名:
2
3
4
5
6
7
8
9
10
11
12
13
14
15
16<ChildComponent v-model="childValue"/>
export default {
model: {
prop: 'test',
event: 'change'
},
props: {
test:String
},
methods: {
changeValue(value) {
this.$emit('change', value)
}
}
}
如果希望双向绑定多个值,便只能使用 v-bind.sync,并抛出 update:属性名 事件。
Vue2 中,通过
v-bind.sync双向绑定多个值:
2
3
4
5
6
7
8
9
10
11
12
13
14
15
16<ChildComponent :test1.sync="childValue1" :test2.sync="childValue2"/>
export default {
props: {
test1:String,
test2:String
},
methods: {
changeValue1(value) {
this.$emit('update:test1', value)
},
changeValue2(value) {
this.$emit('update:test2', value)
}
}
}
(2) Vue3 中的双向绑定
Vue3 对应用在自定义组件上的 v-model 进行了修改:
参考
v-bind.sync对事件名进行了规定,事件名由默认update改为固定格式update:属性名更改了默认的属性名,从
value更改为modelValue可以方便地指定属性名,方式为:
v-model:属性名可以在一个组件上使用多个 v-model
除了内置修饰符外,还支持自定义修饰符
自定义修饰符:
1
2
3
4
5
6// 使用自定义修饰符:
v-model:属性名.自定义修饰符="变量名"
// 获取自定义修饰符
通过名为 "属性名Modifiers" 的prop接收,
属性名Modifiers 将是一个对象,其内容为:{自定义修饰符: true}具体请看:
Vue3 中的 v-model:
2
3
4
5
6
7
8
9
10
11
12
13
14
15
16<ChildComponent v-model:test1="childValue1" v-model:test2="childValue2"/>
export default {
props: {
test1:String,
test2:String
},
methods: {
changeValue1(value) {
this.$emit('update:test1', value)
},
changeValue2(value) {
this.$emit('update:test2', value)
}
}
}
2. template、v-for、key
在 Vue2 中,template 不能拥有 key,因此会出现这样奇怪的写法:
1 | |
在 Vue3 中,template 能够拥有 key,且在 template 上使用 v-for 时,key 应该设置在 template 之上。
1 | |
3. v-if 优先于 v-for
在 Vue2 中,如果 v-if 和 v-for 通过作用于一个元素,v-for 会优先作用。
在 Vue2 中,相同情况下,v-if 会优先作用。
4. v-on.native 修饰符被移除
在 Vue2中,对于自定义组件,v-on 默认只会监听通过 $emit 触发的事件,.native 修饰符用于监听组件的原生事件。
在 Vue3 中,自定义组件应该将所有会 $emit 的事件写入 emits 选项中,对于未被放入 emits 选项中的所有事件监听器,Vue 会将它们作为原生事件监听器添加到子组件中,因此无需担心无法监听原生事件的问题。
5. v-for、ref
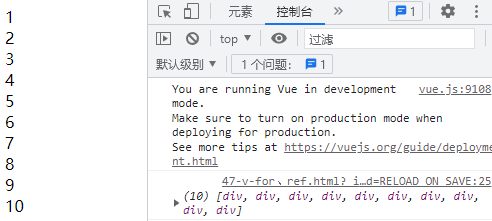
在 Vue2 中,如果在使用了 v-for 的元素上使用 ref,则系统会生成数组并填充到 $refs 中指定的属性之上,如下:
2
3
4
5
6
7
8
9
10
11
12
13
14
15
16
17
18><template>
<div>
<div v-for="item in 10" ref="refList" @click="fun">
{{item}}
</div>
</div>
></template>
><script>
>export default {
name: 'App',
methods: {
fun() {
console.log(this.$refs.refList)
}
}
>}
></script>
在 Vue3 中,同样的情况下,将不会再创建数组放入 $refs 中。
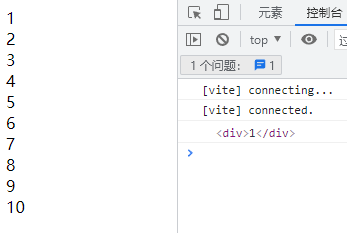
在 Vue3 中,如果传递给 ref 属性一个函数,则它会调用该函数并传递元素的引用。因此,可以通过函数获取 v-for 的每个元素的引用,并在函数中将引用存储起来。在希望获取元素时,从存储的变量中获取,而非从 this.$refs 中获取。=
2
3
4
5
6
7
8
9
10
11
12
13
14
15
16
17
18
19
20
21
22
23
24
25<template>
<div v-for="item in 4" :ref="setItemRef" @click="fun">
{{item}}
</div>
</template>
<script>
export default {
data() {
return {
itemRefs: []
}
},
methods: {
setItemRef(el) {
if (el) {
this.itemRefs.push(el)
}
},
fun() {
console.log(this.itemRefs[0])
}
}
}
</script>
三、组件
1. 函数式组件
不再推荐使用函数式组件
因为在 Vue3 中,相较普通的组件没有性能提升
函数式组件不再支持组件式写法
函数式组件不再支持模板式写法
函数式组件只能以函数创建,函数接收 props 和 context(包含 attrs、slots、emit),返回渲染结果
2. 异步组件
不同于 Vue Router 的异步加载路由组件
引入异步组件的方法发生了改变。
Vue2 中:
const asyncModal = () => import('./Modal.vue')
2
3
4
5
6
7const asyncModal = {
component: () => import('./Modal.vue'),
delay: 200,
timeout: 3000,
error: ErrorComponent,
loading: LoadingComponent
}
Vue3 中:
2
3import { defineAsyncComponent } from 'vue'
const asyncModal = defineAsyncComponent(() => import('./Modal.vue'))
2
3
4
5
6
7
8
9import { defineAsyncComponent } from 'vue'
const asyncModalWithOptions = defineAsyncComponent({
loader: () => import('./Modal.vue'),
delay: 200,
timeout: 3000,
errorComponent: ErrorComponent,
loadingComponent: LoadingComponent
})
3. emits
Vue3 新增了 emits 选项, 用于定义组件会向父组件 emit 的事件。
四、渲染函数
1. render() 函数去除参数
在 Vue2 中,render() 函数有两个参数,分别为 createElement 和 context,通过 createElement 创建元素并返回,通过 context 访问组件的上下文。
在 Vue3 中,render() 函数没有了参数,
对于 createElement,应该从 vue 中导出:
Vue2 中:
1
2
3render(h) {
return h('div')
}Vue3 中:
1
2
3
4
5
import { h } from 'vue'
render() {
return h('div')
}h是createElement的惯用别称对于 context,在 Vue3 中,render 将主要在 setup 中使用,因此它可以访问通过 setup 访问到上下文
2. $scopedSlots 被移除
现在 $scopedSlots 作用域插槽被移除了,它被统一到了 $slots 中。
五、自定义元素
1. is 属性的特殊效果只适用于 component
在 Vue2 中,如果在组件上使用 is 属性,并传入第二个组件名,则会渲染第二个组件。
Vue2 中:
2// 渲染 bar 组件
<foo is="bar" />
在 Vue3 中,is 属性将只在 component 中起效,如果使用在其它元素上,is 将会作为普通的属性被传递。
Vue3 中:
2
3
4
5>// 渲染 foo 组件,并传递is属性
><foo is="bar" />
>// 渲染 bar 组件
><component is="bar" />
六、其它
1. 生命周期改名
destroyed被改名为unmountedbeforeDestroy被改名为beforeUnmount
2. mixin 中 data 将会浅合并
在 Vue2 中,混入对象和组件对象的数据将会递归合并,深合并。
Vue2 中:
2
3
4
5
6
7
8
9
10
11
12
13
14
15
16
17
18
19
20
21
22
23
24
25
26
27
28
29const Mixin = {
data() {
return {
user: {
name: 'Jack',
id: 1
}
}
}
}
const CompA = {
mixins: [Mixin],
data() {
return {
user: {
id: 2
}
}
}
}
// 结果
{
"user": {
"id": 2,
"name": "Jack"
}
}
在 Vue3 中,data 将会浅合并。
Vue3 中:
2
3
4
5
6
7
8
9
10
11
12
13
14
15
16
17
18
19
20
21
22
23
24
25
26
27
28const Mixin = {
data() {
return {
user: {
name: 'Jack',
id: 1
}
}
}
}
const CompA = {
mixins: [Mixin],
data() {
return {
user: {
id: 2
}
}
}
}
// 结果
{
"user": {
"id": 2
}
}
3. 监听数组时默认只会监听指针
在 Vue3 中,对数组的监听默认只会监听指针,如果希望监听数组的变动,应该主动加上 deep 选项。
4. 单纯的 template 不能再充当隐形包裹框
在 Vue2 中,template 能够充当隐形的包裹框,它能够用于在模板编写时包裹元素,并在模板编译后自动 “消失”。
Vue2 中:
2
3
4
5
6
7
8
9
10
11
12
13
14
15
16<template>
<h1>Hello</h1>
<div>···</div>
</template>
<template v-if="true">
<h1>Hello</h1>
<div>···</div>
</template>
// 编译后
<h1>Hello</h1>
<div>···</div>
<h1>Hello</h1>
<div>···</div>
在 Vue3 中,template 只能在带有 vue 指令(v-if、v-for、v-slot)时,才能够充当隐形包裹框,否则将会被渲染为原生的 template 元素。
Vue3 中:
2
3
4
5
6
7
8
9
10
11
12
13
14
15
16
17
18<template>
<h1>Hello</h1>
<div>···</div>
</template>
<template v-if="true">
<h1>Hello</h1>
<div>···</div>
</template>
// 编译后
<template>
<h1>Hello</h1>
<div>···</div>
</template>
<h1>Hello</h1>
<div>···</div>
七、被移除的 API
1. 过滤器被移除
在 Vue3 中,过滤器被移除,建议使用方法或计算属性替代。
2. $children 被移除
在 Vue3 中,$children 被移除,如果希望访问子组件,应该通过 ref 访问。
八、动态 CSS
在 Vue3 中,允许 style 中使用组件的数据,使用方法如下:
1 | |

